Create an Apple Shortcut to View Results of a PCO List
I recently had our Young Adults pastor ask if I could find a quick way for him to check a PCO list he had created of all the young adults that had a birthday today. I knew he wouldn’t check email every day, and he wanted something he wouldn’t have to think about. Because our staff at Curate Church in New Zealand use Apple devices, I turned to the relatively new automation software built into every Mac, iPhone and iPad - Apple Shortcuts. Apple Shortcuts is installed on all iOS devices running iOS 13 and above, or on Mac devices running macOS Monterey.
In this post, I want to show you how to use an Apple Shortcut to check a list in PCO. Apple Shortcuts are useful because they integrate across devices and are able to run on schedules or when you arrive at a destination. The possibilities for using Apple Shortcuts with PCO People Lists are endless.
Set Up in PCO
This shortcut grabs the data from a list in PCO. So to start with, you need to create the list you would like. I recommend that if your PCO account has more than the most basic ‘view’ permissions, that you set up a different account which just has view permissions.
Create your list and in the settings tab, turn the “Auto-refresh results” option on. This will automatically update your list every night. Copy down the number of the list in the web address. It should look something like this - https://people.planningcenteronline.com/lists/628268/
Now you’ll need to get technical and visit https://api.planningcenteronline.com/oauth/applications . Make sure you are logged in with the account with the view only access. In the ‘Personal Access Tokens” section, press the button ‘New Personal Access Token’. Copy the Application ID and Secret. You’ll be using these in the Apple Shortcut in just a moment.
Now you have all the pieces of information required to create shortcut. What we’re going to do is ask the shortcut to poll the PCO API (application programming interface), retrieve all of the information about the PCO list you’ve created, and then display the names of the people on that list. Simple.
Let’s go!
Create an Apple Shortcut
On an iOS device, in order to open this shortcut, you will need to go into the Settings App on your device and in the ShortCuts settings, select ‘Allow Untrusted Shortcuts’. If you’re not sure about this, keep reading below to see what this shortcut does (it’s nothing bad, I promise!)
On your Apple device click on the link below to download the Apple Shortcut “PCO List Check”.
https://www.icloud.com/shortcuts/040f7a966359413d958f00ff842fb018
When the shortcut loads, you will be able to scroll through the shortcut to the very bottom and press the red button “Add Untrusted Shortcut”. As you scroll through the shortcut you can verify that it won’t be doing something unexpected on your device (like running malicious scripts, etc).
You’ll need to download the shortcut to your device, and then open it and paste the details you collected above to make it work. First paste your Application ID, then your Application Secret, then the number of the PCO List into the boxes as indicated in the image below.

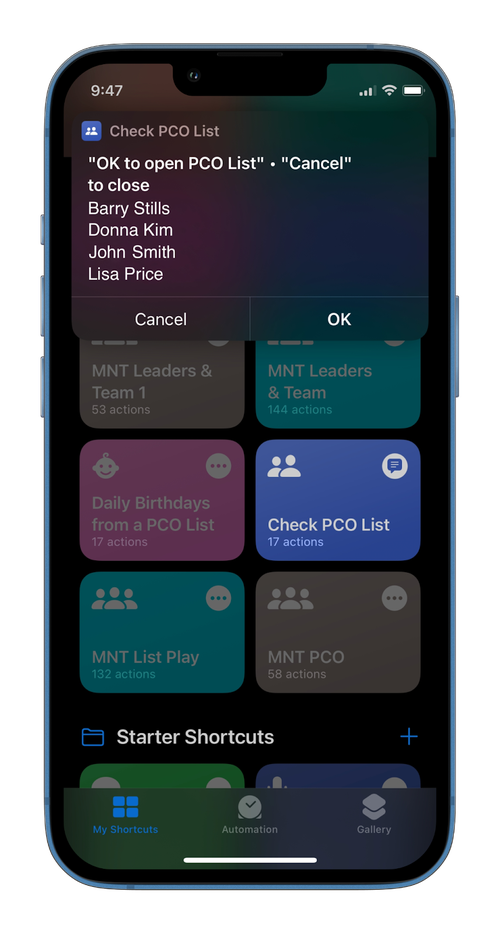
The rest of the comments in the Apple Shortcut help you to see what is happening in the shortcut. Once you have pasted in the information required, press the Play button (at the top right on a Mac or bottom right on an iPhone). This will run the shortcut, and you should see an alert showing the results of your list.
If you press ‘Cancel’ you will close the alert. If you press ‘OK’ you will open the PCO List in your web browser.
And that’s all there is to it! You can try adding other actions or grabbing information other than the name from the PCO List. It’s always a good idea to duplicate the shortcut first so you keep the original. 😀
Set Up an Automation
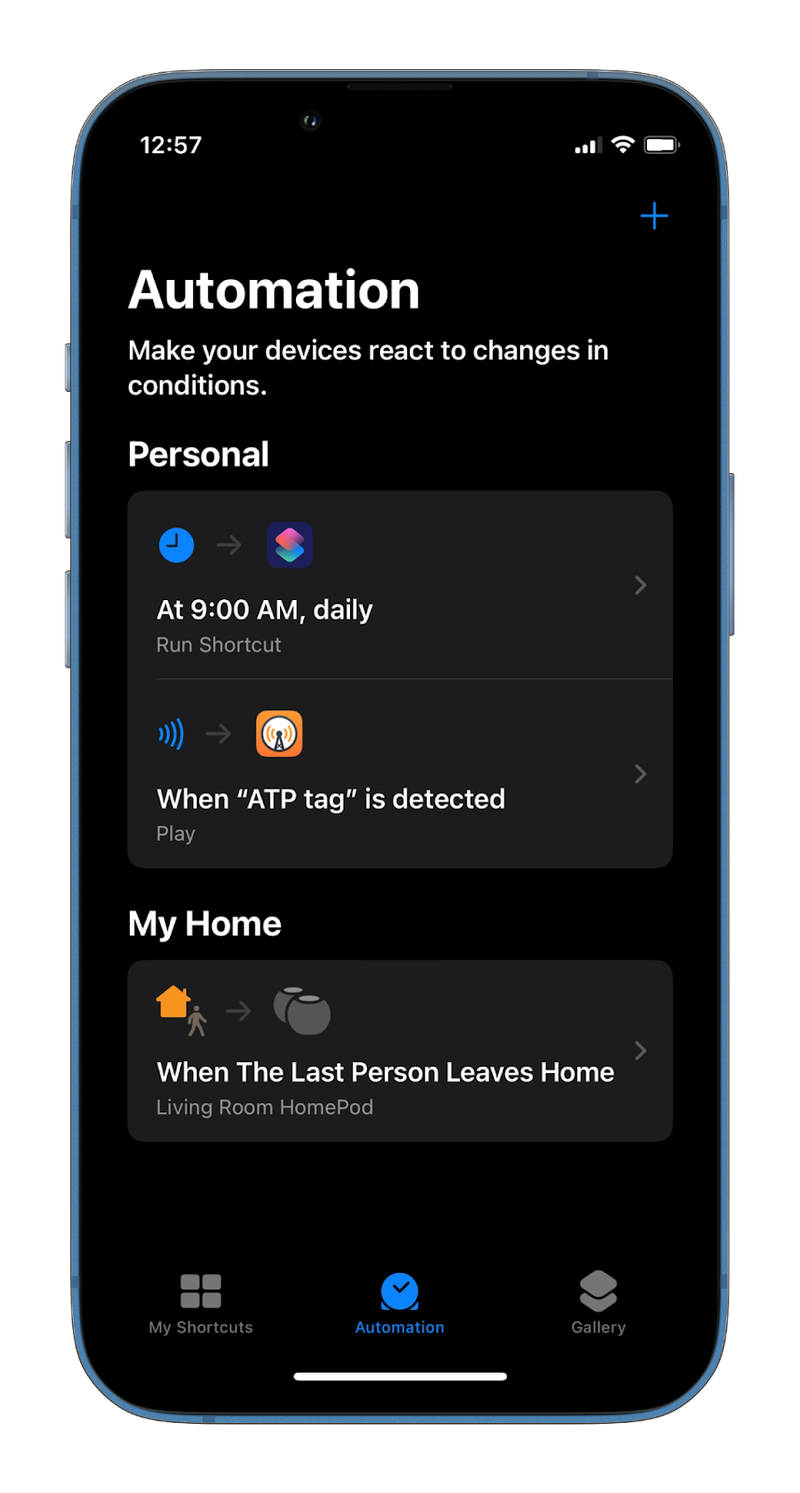
When you are happy with your shortcut, you can look at the “Automation” settings in Apple Shortcuts (on the iPhone and iPad) and decide when you would like your shortcut to run - at a set time every day, when you arrive at the office, when you join a particular wifi network, etc. There are plenty of options! I’ve written the actions below to create an automation from my iPhone that runs every day at a set time.
- Click on the Automation tab, and press the blue ‘Plus’ button (at the top right).
- Select ‘Create Personal Automation’.
- Choose the type of automation you want to use. I’m using the first automation ‘Time of Day’.
- Select the time of the day and choose how often you want the shortcut to run (daily, weekly, monthly). Press the blue ‘Next’ button (at the top right).
- Press the ‘Add Action’ button, and search for ‘Shortcuts’.
- Under ‘Scripting’ select the action ‘Run Shortcut’.
- Tap on the top action where it says ‘Shortcut’ and select the shortcut you’ve created above (PCO List Check). Press the blue ‘Next’ button (at the top right).
- Check the actions are correct and press the blue ‘Done’ button (at the top right).
That’s it. Have fun!
Matt Thomas works for Curate Church in New Zealand as a Digital Innovation Developer. Before this he was a Teacher and Apple Distinguished Educator. You can contact him at matt@curatechurch.com.
(The link to the shortcut should NOT have my PCO Credentials in it. I’ve checked a few times, so hopefully I’ve got that right! Also, I have changed the names of the people listed in the screenshot at the very top of the page. They are all fictional.)